This section tells you everything you need to know about how to play The Scene. Get started with the Overview for a high-level summary, or dive into the detailed sections below to master the mechanics.
This is the multi-page printable view of this section. Click here to print.
How To Play
Description of the game rules.
- 1: Core Concepts
- 2: The Board
- 3: Cards
- 4: Adversaries
- 5: Obstacles
- 6: The Shop
- 7: Your Collection
1 - Core Concepts
Learn about the fundamental resources like  ,
,  ,
,  ,
,  and the overall structure of the game.
This page explains the fundamental resources, game states, and the overall structure of a run in The Scene.
Core Resources
Your success depends on managing four key resources:
-
Hype: This is the energy you need to play cards. Represented by a green star, Hype is your primary in-encounter resource. You’ll start each encounter with a set amount of Hype, and many card abilities will help you gain more. Any leftover Hype at the end of a victorious encounter is converted into Accolades.
-
Culture: This is your score, represented by a purple trophy. To win an encounter, you must accumulate enough Culture to meet the current Adversary’s Culture Threshold. Culture is primarily gained when your cards successfully “score” by reaching the top of a lane.
-
Cheese: This represents controversy, tackiness, or just plain bad vibes. Represented by a slice of orange cheese, this is a penalty you want to avoid. If your total Cheese ever exceeds the Adversary’s Cheese Tolerated threshold, you immediately lose the encounter. Certain cards and abilities generate Cheese, so manage it carefully!
-
Accolades: This is the meta-currency of the game, earned by winning encounters. You use Accolades in the Shop Phase between encounters to purchase new cards, booster packs, and other upgrades to build a stronger deck for your run.
Game Structure
A single playthrough of The Scene is called a “run.” A run is composed of a series of encounters against Adversaries, with a shop phase in between each.
Encounters & The Board
Encounters are where the core gameplay happens. The board is composed of four vertical lanes, each with five slots. You play cards from your hand to the bottom slot of a lane.
The Shop Phase
After successfully completing an encounter, you’ll enter the shop. Here, you can spend your hard-earned Accolades to improve your deck. The shop offers:
- Booster Packs: Packs of cards that let you discover new characters and abilities.
- Individual Cards: Sometimes specific cards are for sale.
- Rerolls: Don’t like what’s on offer? You can pay to refresh the shop’s inventory.
Deck-building is key, and the shop is where you make the strategic decisions that will shape your run.
Turn Structure
Each turn in an encounter is broken down into several phases:
- Start of Turn: Some abilities trigger, and the Adversary may deploy an Obstacle to the board.
- Draw Phase: You draw one card from your deck.
- Play Phase: This is your main action phase. You can:
- Play one card from your hand to the bottom of a lane.
- Attach Actor or Writer cards to Role cards already on the board.
- Activate special abilities on your cards.
- Instead of playing a card, you may discard one card for a small Cheese penalty.
- Movement Phase: All cards on the board that weren’t just played or interacted with move up one slot in their lane. If a card moves past the top slot, it scores!
- End of Turn: End-of-turn abilities trigger, and play proceeds to the next turn.
2 - The Board
Description of the board.
The game screen of The Scene is where all the action happens. It’s divided into several key areas, each providing important information and controls.
Board Anatomy
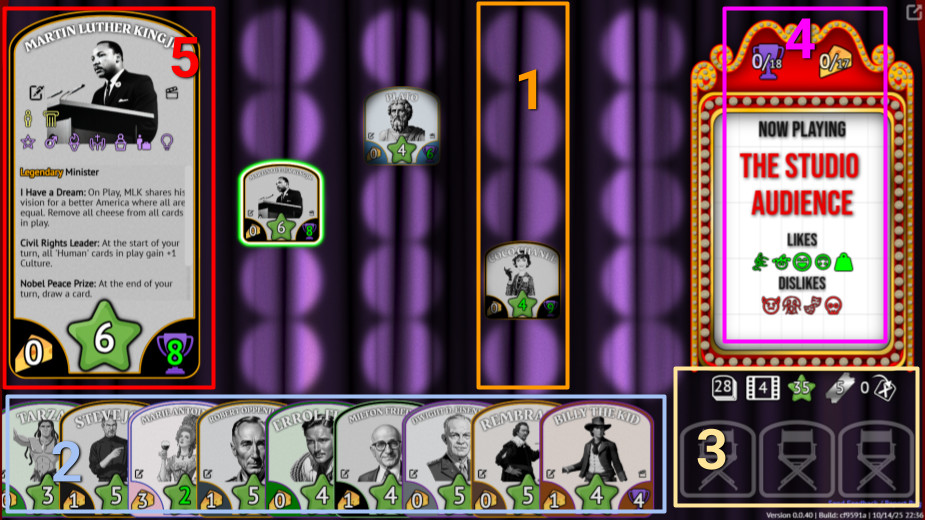
Here is a breakdown of the numbered areas in the image above:
-
A Lane: The main play area consists of four vertical Lanes. Each lane has five slots. You play cards onto the bottom slot, and they move up one slot each turn. When a card moves past the top slot, it scores.
-
Your Hand: This area at the bottom of the screen displays the Cards you currently have available to play. Clicking on a card will populate the info area with more details (see #5). Once a card is selected, you may play it by clicking on an open bottom slot, the crew area (#3), or onto another card on the board (see portrayals).
-
Player Info Area: This section shows your current status, from left to right:
- The number of cards left in your Deck.
- The number of the current Turn.
- Your current
Hype total.
- Your current
Accolades total.
- The number of cards in your deck and discard pile.
Beneath this information is the Crew Area. This is a special area where you can play up to three Crew cards. Cards in the Crew Area provide powerful, persistent effects that last for the entire run. Cards played here carry over between encounters.
-
Adversary Info Area: This panel on the right side of the screen gives you the details on your current opponent, from top to bottom:
- Your current
Culture total and the total required to win
- Your current
Cheese total and the threshold at which you will lost
- The Adversary’s name (in this example The Studio Audience)
- Tags and Archetypes the adversary Likes and Dislikes. Matching these tags with scoring cards will bestow bonuses and penalties, respectively.
- This adversary Likes:
 Animated,
  Buffoon,
 Comedic,
  Quirky, and
  Slapstick
 - This adversary Dislikes:
 Villainous,
  Terrifying,
 Dramatic, and
  Horror
- This adversary Likes:
- Your current
-
Card / Obstacle Info Area: When you select a card or an obstacle on the board or in your hand, this area on the left provides a detailed view. You can see all of its stats, descriptors, and the full text of its abilities. If a card has an activatable ability, the button to use it will appear here. The elements you can see in order from top to bottom:
- Card Name (Martin Luther King Jr.)
- Card Portrait
- Writer and Actor slots. These appear on cards that are able to be portrayed by an
 Actor
or
Actor
or  Writer card.
 - Archetypes in yellow (in this example
 Human and
  Historical Figure)
 - Tags in lavender (in this example tags include
 Iconic,
  Male, and
  Heroic)
Lane Closure
Some effects may cause a lane to be Closed. This effectively temporarily removes the lane (and anything in it) from the game until the lane is re-opened. The specific effects are as follows:
- Cards may not be played into a Closed Lane.
- Cards already in a closed lane do not move during the Player’s turn.
- Cards inside a Closed Lane will not have most of its abilities trigger.
- The lane is effectively “invisible” to abilities and effects.
Note that if all lanes are ever closed and you can’t open them back up, you will immediately lose the encounter!
3 - Cards
Discover the different types of cards, how to create powerful Portrayals, and how abilities work.
Cards are the heart of The Scene, representing the vast universe of pop culture characters, real-life personalities, and groups you can recruit for your scene.
Card Anatomy
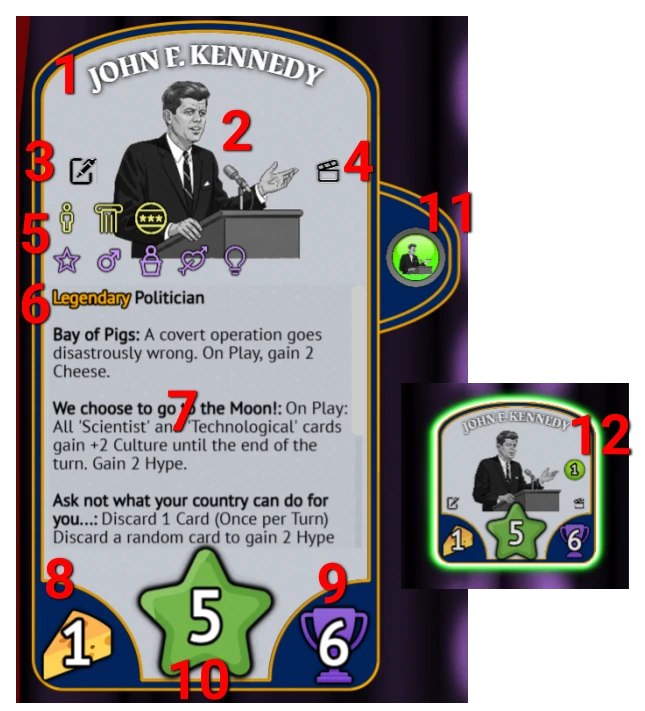
There are two representations of a card in The Scene. There is the card itself, which appears in your hand and in the board’s lane areas, and the card info panel, which displays detailed information about the currently selected card. This area is used for Obstacle details, as well.
Each card has several key properties that define its function and feel:
- Name: Identifies the card.
- Portrait: A graphical depiction of the person (or entity) represented by the card.
- Writer Slot: An icon that appears if a writing portrayal is able to be played on this card.
- Actor Slot: An icon that appears if an acting portrayal is able to be played on this card.
- Descriptors: Tags & archetypes that define a card’s traits (e.g.
Actor,
 Fictional,
 Science Fiction,
  Professional (Law Enforcement)). These are crucial for synergies and for how Adversaries react to your cards. Liked descriptors will be shown in green, while Disliked descriptors will
appear in red. You can see a comprehensive listing of all Tags and Archetypes on the Descriptors reference page.
Professional (Law Enforcement)). These are crucial for synergies and for how Adversaries react to your cards. Liked descriptors will be shown in green, while Disliked descriptors will
appear in red. You can see a comprehensive listing of all Tags and Archetypes on the Descriptors reference page. - Short Description: This includes both the card’s Rarity (Common , Uncommon , Rare , Legendary ) and the primary feature of the card as derived from its tags and archetypes. Rarity determines how often a card appears and generally correlates with its mechanical complexity and power.
- Abilities: The unique effects the card can perform. These are what make each card special. Most abilities trigger automatically, but some are Activated manually.
-
Cheese: The base
Cheese value the card contributes when it scores.
-
Culture: The base
Culture value the card contributes when it score
- Cost: The amount of
Hype required to play the card from your hand.
- Activated Ability Button: This button appears only when a selected card has an Activated ability. If the button is enabled, you can click it to use the ability.
- Activated Ability Indicator: This small icon appears if the card has an Activated ability available to use. It allows you to quickly scan the game board for cards with actions you can take.
Cards also have a background color and a border color. The background color is simply cosmetic and is meant to be an abstract reflection of the person depicted on the card. It has no mechanical value. The border color matches the Rarity of the card. In this example, John F. Kennedy is Legendary , so his border is gold.
Discovering Cards and Abilities
A key part of the fun in The Scene is discovering what each character can do. When you first encounter a card, its abilities will be hidden from you.
- Reveal on Use: An ability is only revealed the first time it is triggered or activated. Until then, you’ll see a placeholder (like
???) where the ability description should be. - Persistent Discovery: Once an ability is revealed, it stays revealed forever. This knowledge persists across all your future runs, allowing you to build up your understanding of the game’s vast pop culture universe over time. You can see everything you’ve unlocked by viewing your collection from the game’s main menu.
- Easter Eggs: Some abilities are completely hidden and don’t even show a placeholder. These are rare “easter eggs” waiting to be discovered through clever play and specific interactions!
Card Types
Cards come in several varieties, each with a specific role to play.
- People: The general term for any card representing a single individual, whether a real person or a fictional character.
- Roles: Cards representing fictional characters or historical figures (e.g.
Tom Sawyer,Abraham Lincoln). These cards have special slots for attachments. - Actors & Writers: Cards with the
Actor or
Writer archetypes can be attached to Role cards to create a Portrayal.
- Groups: Cards with the
 Group Group archetype represent a collective (e.g., a band, a comedy troupe). They cannot participate in portrayals.
 - Crew: Cards with the
 Crew archetype can be played to a separate Crew Area instead of the main board. They provide powerful, persistent effects that can define your strategy for the entire run.
Portrayals: Bringing Roles to Life
A key mechanic in The Scene is attaching Actor and Writer cards to Role cards. This creates a Portrayal, which modifies the Role’s Culture and Cheese output.
- Attaching: You can play an Actor or Writer from your hand onto a Role card that is already on the board.
- Portrayal Types:
- Canonical: The actor/writer is the one who actually portrayed/wrote the role in the real world (for example if you were to play Charlie Chaplin onto The Tramp). This gives a significant 50% Culture bonus!
- Parody: The actor/writer portrayed the role in a parody setting. This gives a 25% Culture bonus, and any
from the portrayal is ignored when scoring!
- Normal: A standard casting where the talent and role share some logical descriptors. No bonus or penalty.
- Miscast: A wacky casting where the talent and role have very little in common. This incurs a 25% Culture penalty and adds +2 Cheese.
Important
Card Abilities & Statuses
- Abilities: These are the special rules on cards, defined by a trigger (like “when played” or “when this card scores”), conditions, and effects. Most are automatic, but some rare abilities can be activated by the player. Usually, when an ability triggers, you will see a speech bubble appear on the card on which it triggered.
- Status Effects: Cards can be affected by temporary or permanent statuses that change their behavior. For a full list, see the Status Effects reference page.
4 - Adversaries
Understand the Fandoms and Bosses you’ll face, and how their preferences shape your strategy.
Adversaries represent the opposition you face in each encounter. They are the embodiment of a specific fandom, a cultural movement, or a final boss, and they set the rules and victory conditions for the encounter.
Fandoms & Bosses
- Fandoms: These are the standard adversaries you will face for most of your run. Each represents a specific group of fans with their own tastes and preferences (e.g., “Sci-Fi Enthusiasts,” “Horror Aficionados”).
- Bosses: After defeating a series of Fandoms, you will face a final Boss. These are much tougher encounters representing a major “Cultural Event” and serve as the climax of your run. Examples might be “The Moon Landing” or “The World’s Fair”.
Victory and Defeat
Each Adversary defines the win and loss conditions for the encounter:
- Culture Threshold: This is the amount of
Culture you must score to win the encounter.
- Cheese Tolerated: This is the maximum amount of
Cheese you can accumulate. If your
level ever exceeds this number, you lose immediately.
As you progress through a run, the Fandoms you face will become more difficult, with higher ![]() requirements and lower
requirements and lower ![]() tolerance.
tolerance.
Influencing the Scene
Adversaries are not passive observers; they actively influence the game.
Liked & Disliked Descriptors
Every Adversary has a set of Liked and Disliked descriptors. These preferences are key to maximizing your score.
- When a card scores, every descriptor on that card (and any attached cards) is checked against the Adversary’s lists.
- For each matching Liked descriptor, you gain +1 bonus
.
- For each matching Disliked descriptor, you gain +1 additional
.
Playing to the Fandom’s tastes is a critical strategy for success!
Deploying Obstacles
Adversaries are also responsible for deploying Obstacles to the board. Each Adversary has a thematic pool of obstacles they can use to disrupt your plans. At the start of each turn, there is a chance the Adversary will place a new obstacle on the board, forcing you to adapt your strategy.
5 - Obstacles
Learn about the challenges Adversaries will throw in your way and how to overcome them.
Obstacles are non-card entities that the Adversary deploys to the board to disrupt your scene. They represent challenges, environmental effects, or other hindrances that can block your cards or apply negative effects.
Obstacle Anatomy
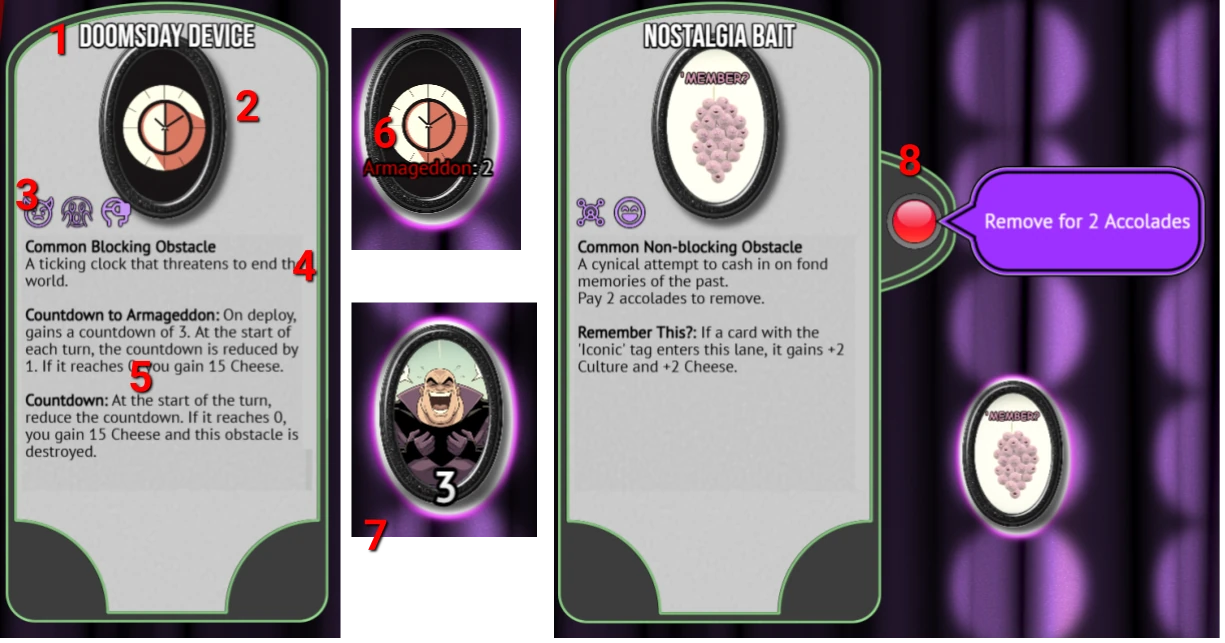
As with Cards, there are two representations of an Obstacle. Its existence on the board, and its appearance in the info panel when selected. Here’s a breakdown of the key properties:
- Name: Identifies the Obstacle
- Potrait: Visual depiction of the Obstacle
- Descriptors: Like cards, Obstacles can have Tags and Archetypes. While these do not interact with the Adversary in the same way they do on cards, many abilities target or affect only Obstacles with specific descriptors.
- Description: As well as providing a short description of what the Obstacle represents thematically, this area also shows:
- The rarity of the Obstacle: Common or Legendary
- Whether the Obstacle is Blocking or Non-blocking
- Abilities and Effects: Just like cards, Obstacles also have abilities and effects that trigger in different situations. Also like cards, these are initially hidden until the player triggers them (and then they stay visible forever).
- Counters: Some Obstacles (like the Doomsday Device depicted) can have associated counters added to them. Counters will always have a name. The Obstacle’s description will indicate what the counters are for. Most Obstacle do not have counters, though.
- Expiration: Several Obstacles expire after a given number of turns. This is shown by a large number at the bottom of the Obstacle (and is also shown in the info panel when selected). In this example, the Monologue obstacle shows that it expires in 3 turns. Expiration counts decrease at the end of each turn.
- Removal and Activated Abilities: Obstacles that are able to be removed will show a red button like this. Clicking the button will remove the obstacle immediately after deducting the specified cost. Some Obstacles (especially Legendary ones) have activated abilities or removal criteria that are not as simple. Those Obstacles will explain how they work in the info panel.
Obstacle Types
Obstacles come in two main flavors (rarities):
- Common : These are common annoyances. They might have minor effects or simply get in your way.
- Legendary : These represent iconic and specific pop culture antagonists or concepts. They are much more powerful, often have global effects, and are harder to remove. Successfully removing a Legendary Obstacle unlocks a specific, powerful card for your collection!
How Obstacles Work
-
Deployment: At the start of each turn, the Adversary has a chance to deploy an Obstacle from their pool onto the board. They will almost never be placed in the bottom row, ensuring you always have a space to play new cards.
-
Blocking vs. Non-Blocking: Every obstacle is either Blocking or Non-blocking.
- A Blocking obstacle acts as a solid wall. A card cannot move into or through its space until the obstacle is removed.
- A Non-blocking obstacle allows cards to move into its space, but doing so will typically trigger a negative
onLandedeffect.
-
Effects: If a player action or board situation triggers an obstacle’s effects, it will show a speech bubble, just like cards do.
Removing Obstacles
Getting rid of obstacles is crucial to keeping your lanes clear and your cards moving. While some card abilities are designed to remove them, many obstacles have a built-in removal method that doesn’t require a specific card.
These methods often require an activation cost, which you can pay during your Play Phase:
- Payment: Pay a one-time cost to clear the obstacle. This payment could be one of several types:
- A payment of
,
, or
- Accepting some amount of
- Discarding one or more cards
- A payment of
- Expiration: Some obstacles have a turn counter that ticks down. When it reaches zero, the obstacle removes itself.
Legendary Obstacles often have more complex and costly removal conditions, befitting their powerful nature.
Obstacle Abilities & Statuses
Like cards, obstacles have abilities that trigger based on game events (e.g. “when a card lands on this”, “when a card is blocked by this”, etc.). They can also be affected by Status Effects, which might disable their abilities or reduce their removal cost.
6 - The Shop
Where you build your deck and strengthen your cast.
Between each encounter, you get to take a breather and visit the Shop. This is the primary way you’ll build your deck, discover new characters, and develop your strategy for the rest of the run.
Your Currency:
Accolades
The Shop doesn’t take cash or credit. The only currency accepted here is ![]() Accolades, which you earn by successfully defeating Adversaries. The better you perform in an encounter (high
Accolades, which you earn by successfully defeating Adversaries. The better you perform in an encounter (high ![]() , low
, low ![]() ), the more
), the more ![]() Accolades you’ll earn. Any
Accolades you’ll earn. Any ![]() Hype you have left over is also converted into
Hype you have left over is also converted into ![]() Accolades.
Accolades.
What’s for Sale?
The shop, themed like a movie theater concession stand, offers a rotating selection of items.
Booster Packs
This is the main way you’ll acquire new cards. The shop will always offer a selection of booster packs which will provide an assortment of cards
that are thematically associated with the pack. For example, the Talking Heads pack might contain a selection of ![]() Journalist or
Journalist or ![]() Media-Personality cards, while the Cartoon Cavalcade of Cards contains mainly
Media-Personality cards, while the Cartoon Cavalcade of Cards contains mainly ![]() Animated characters.
Animated characters.
- Standard Booster: Contains 3 cards. Costs 3
and you may select one to keep.
- Mega Pack: Contains 5 cards. Costs 5
, but you can select two cards to keep.
Each booster pack is guaranteed to contain at least one card of Uncommon rarity or higher, and will never contain more than one Legendary.
Individual Cards
Sometimes, you’ll see individual cards for sale. This is a great way to grab a specific character you need to complete a synergy or fill a gap in your strategy. The price is based on the card’s rarity:
- Common
: 1
- Uncommon
: 2
- Rare
: 4
- Legendary
: 8
Choosing Your Cards
When you buy a booster pack, you don’t automatically get all the cards inside. You get to choose one card from a standard booster or two cards from a Mega Pack to add to your deck. This makes every purchase a strategic choice!
Note: During the initial deck draft at the very start of a run, you get to keep all the cards from the boosters you open.
Refreshing the Shop
Not inspired by the current selection? For a price, you can reroll the entire shop inventory.
- The initial cost is 4
.
- The cost to reroll increases each time you do it within the same shop phase.
- A reroll will never show you any of the items that were in the previous shop offering, so you’re guaranteed a fresh look.
7 - Your Collection
Inspect the cards you’ve discovered.
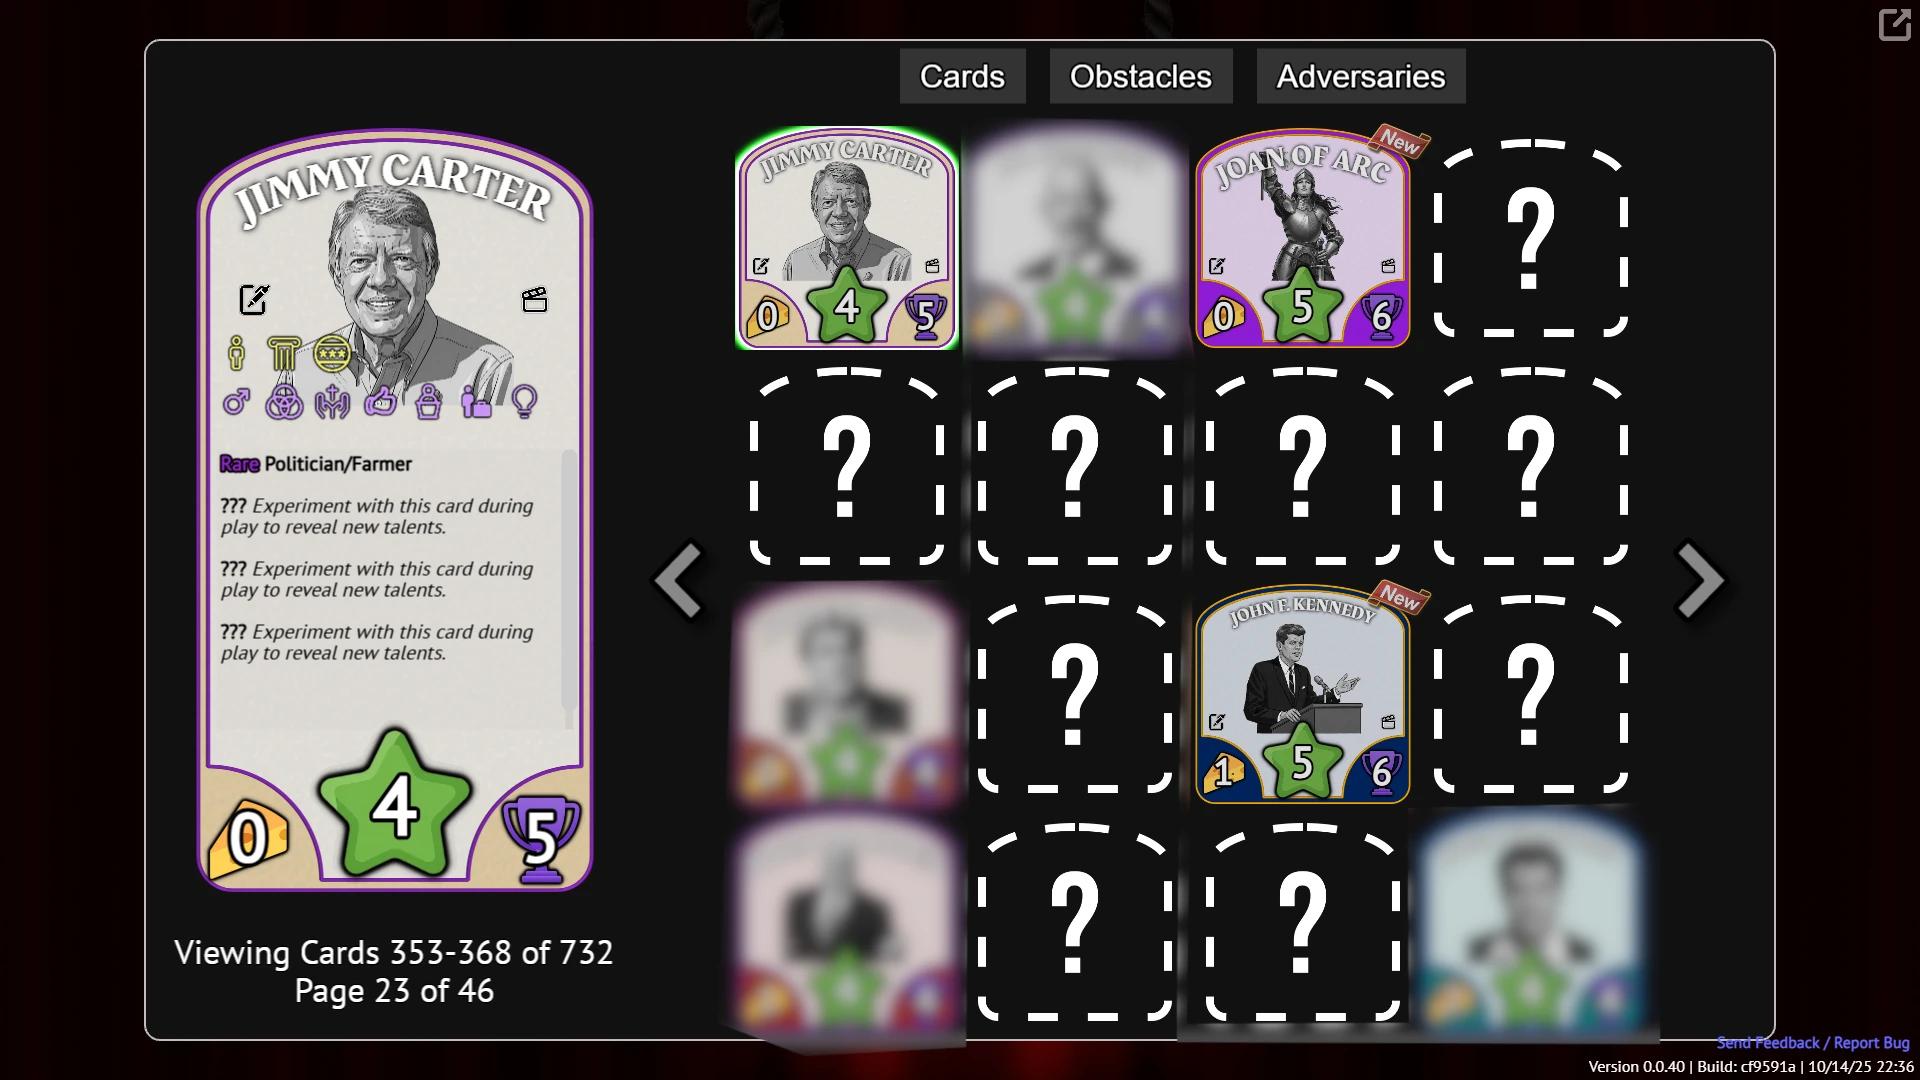
As you play The Scene, you’ll constantly discover new Cards, Obstacles, and Adversaries and reveal their hidden abilities. The Collection is your personal library where you can browse and admire every character and ability you’ve encountered on your journey through pop culture.
Here’s a sneak peek of what a collection page might look like (blurring some cards to prevent spoilers!).
Accessing Your Collection
You can access your Collection directly from the game’s main menu. It’s the perfect place to visit between runs to review your discoveries and strategize for your next attempt.
What’s Inside?
The Collection screen gives you a complete view of every Card, Obstacle, and Adversary you have ever seen in the game. For each, you can see:
- Full Details: All the stats, descriptors, and artwork.
- Revealed Abilities: Any ability that you have unlocked through gameplay will be fully visible here. If you haven’t triggered an ability yet, it will still appear as hidden (
???), waiting to be discovered in a future run.
Think of it as your own personal encyclopedia of pop culture. It’s a testament to your progress and a valuable tool for planning your next award-winning scene.